
A couple years ago while I was pregnant with Scarlett, I did what all pregnant women do when they can’t sleep at night and spent hours upon hours scrolling through Pinterest trying to find the perfect nursery inspo. I stumbled upon a big letter initial that was covered in flowers and I got it in my head that this was the only thing in the entire world that would complete Scarlett’s room. I went to Etsy where I knew I could surely find one… only to realize that they were going for well over $100. After scouring the internet and piecing together a series of similar DIY projects, I came up with a floral letter DIY concoction that made all of my floral letter dreams come true. Total in supplies I spent maybe $40 and couldn’t be happier with the outcome.
The first letter that I made two years ago was the S and it’s held up perfectly without any issues. Then last week I made the C and it came together just as easily as the S did. I’ve linked everything I used + If you follow my steps below you should be good to go but as always if you have any questions please comment below or shoot me an email!

You will need:
–paper mache initial (I used the 23.5 inch but it would also look cute on a smaller letter)
–artificial flowers in color pallet of choice (I also got a few from Michaels that I had wanted to see in person before purchasing)
–floral foam (you can also use artificial moss, which I think I will try next time!)
–command strips (for hanging on wall)
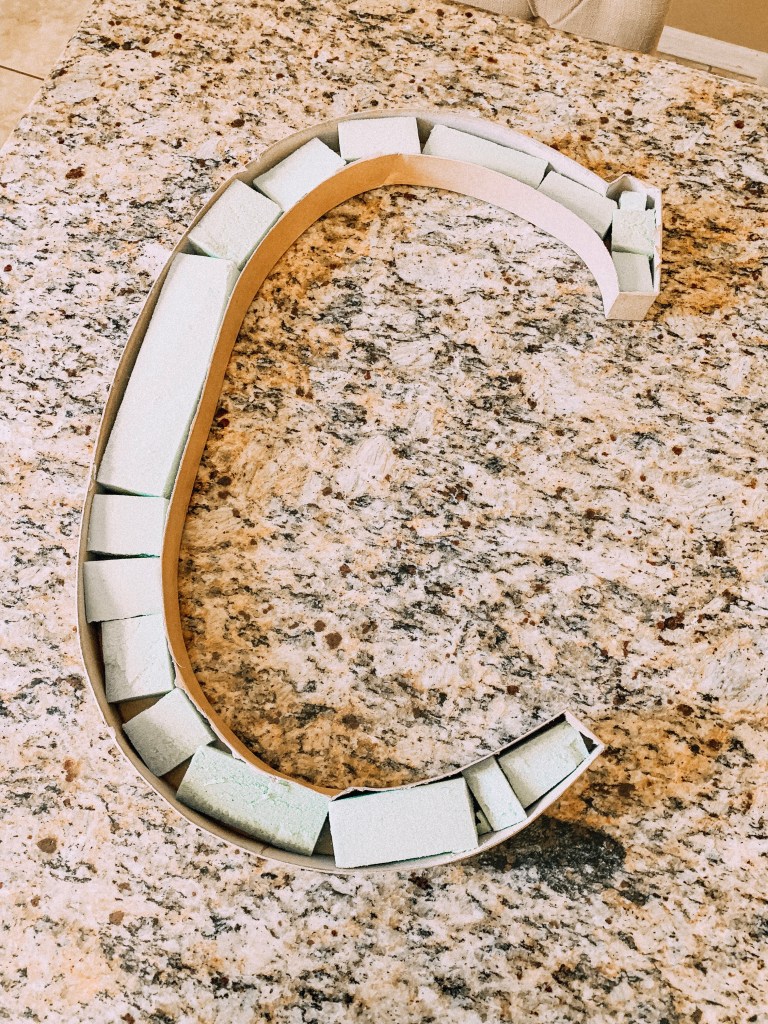
Step 1:
Cut top off of paper mache letter using box cutter. Be sure not to cut into the sides of the letter. As you start cutting you will see that the top peels off pretty easily. Once the top layer has been removed, remove the cardboard inside. Photo below shows what it should look like once you have cut off the top part + removed cardboard stuffing from inside.

Step 2:
Cut floral foam into small pieces. You don’t want them to be seen over the edge of the letter, so make sure you are not making them too thick. Use the hot glue gun to secure to the inside of the letter. See photo below for what it should look like.
Step 3:
Prepare flowers. Pluck the flowers off of their stems. Typically you should be able to pull them right off however if they are really stuck on there you can use wire cutters to remove the flower from the stem. Once all flowers have been removed from stems, lay them out over the letter to plan out how you want them to be displayed. I like to do a series of large flowers and then use the tinier flowers as fillers in between the large ones. I also like to make sure I’m scattering out the colors so that you don’t get too many of the same color flower right next to each other. Once you feel good about your layout, begin using the hot glue gun to glue them into place, making sure to push the flower down into the floral foam as you glue it into place.

Step 4:
Stand back and take a look. Once you finish and stand back to look at it, you’ll most likely see a few spots that look a little gappy. Fill those in with smaller flowers until you’re happy with how full it looks.
Secure command strips to the back and place it on the wall. Admire your work and give yourself a pat on the back.
That’s it, You’re done–its really that simple!

Cheers,
The Whine Connoisseur
